How to Send Ringba Pings to CallScaler
Create a Ringba Ring Tree Target that pings a CallScaler campaign for a live bid and routes accepted calls automatically.
What you're building
A Ringba Ring Tree Target that pings your CallScaler campaign endpoint before routing a call. CallScaler answers in about a second with accepted, a bid, and a phone number — Ringba compares the bid against its other targets and dials the returned number if it wins. Ringba's own reference for this flow is Create a Ring Tree Target to Ping an RTB Campaign; the steps below are the CallScaler-specific version.
Ring Trees must be enabled on your Ringba account. If you don't see Ring Trees in the sidebar, ask your Ringba account representative to turn them on.
Before you start
You need two values from your campaign — both are in the campaign approval email and on My Campaigns (open the campaign and hit API specs):
Network admins: open the publisher under Publishers and choose Download integration guide (PDF) from the ⋯ menu — a send-ready document with every campaign's credentials and this setup.
- •Endpoint URL —
https://…/api/v1/rtb/ping/<token>, unique per campaign. - •X-RTB-Secret — the header value that authenticates your pings.
Step 1 — Create the Ring Tree Target
Go to Ring Trees → Manage Ring Tree Targets and click Create Ring Tree Target.
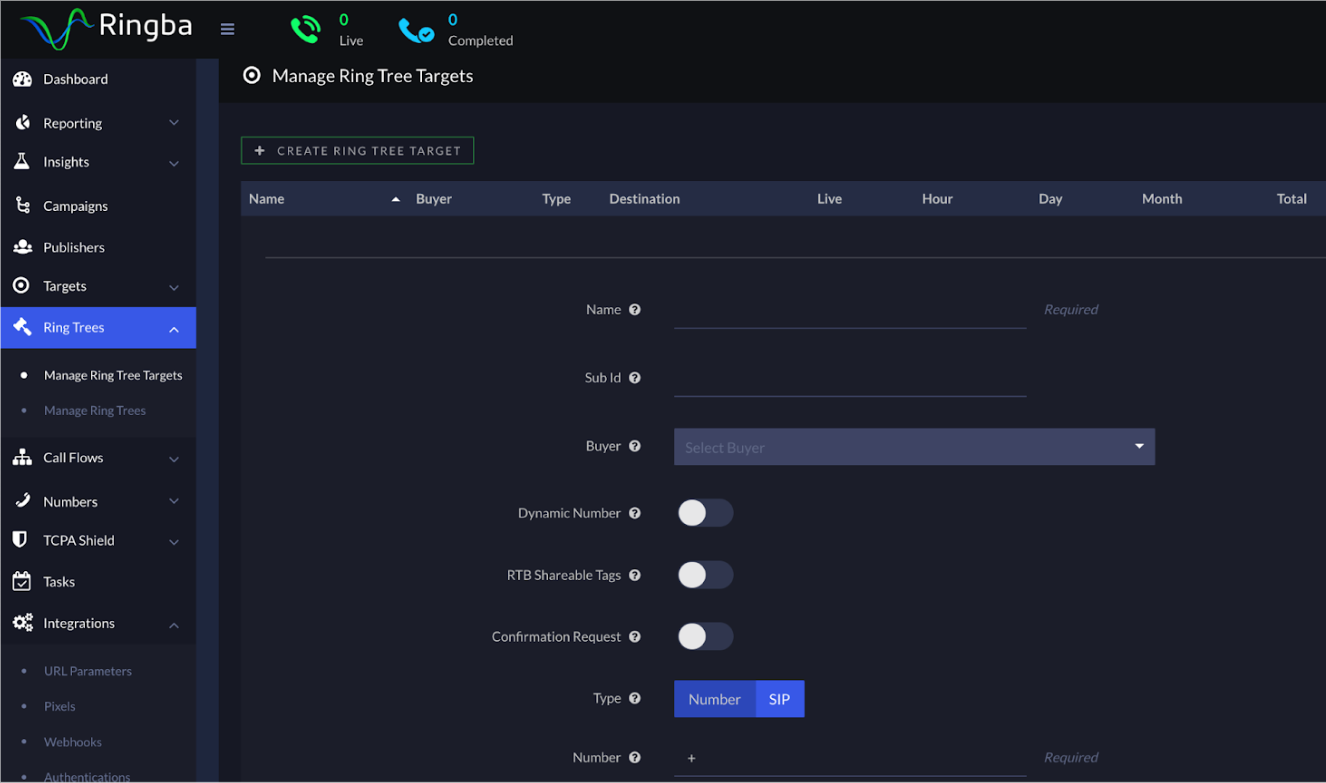
- •Name the target after the campaign.
- •Toggle Dynamic Number on — conversions then record at the bid you accepted instead of a static number's payout.
- •Leave RTB Shareable Tags and the RTB ID off. Those are for pinging another Ringba account — a CallScaler campaign is a direct endpoint you configure under Request Settings instead.
Step 2 — Request settings
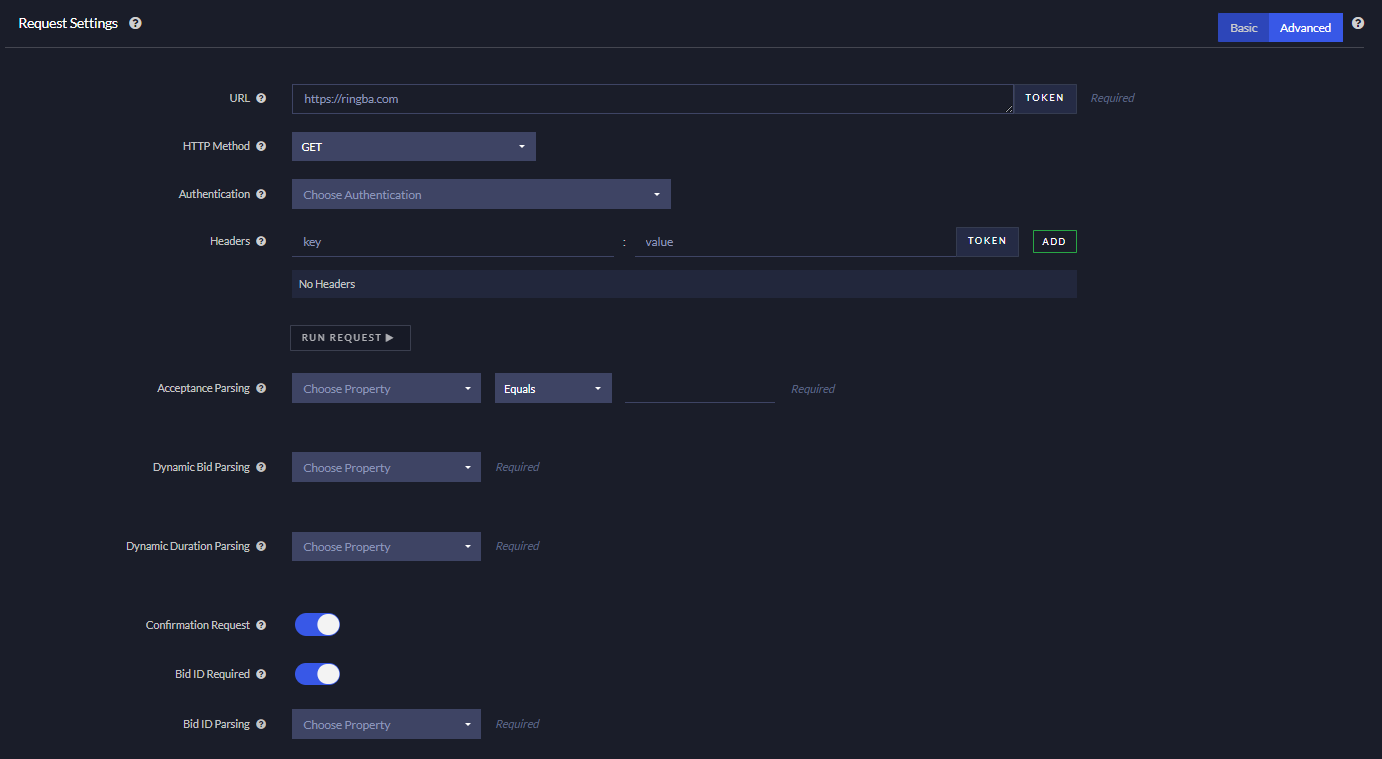
In the Request Settings section, switch to the Advanced editor and wire up the ping:
- •URL — paste the campaign's endpoint URL.
- •HTTP Method — POST, with a JSON body (below).
- •Headers — add
X-RTB-Secretwith the campaign secret and click Add. - •Leave Confirmation Request and Bid ID Required off — CallScaler is one-shot, the ping response already includes the number to dial.
- •Run Request fires a live test at the endpoint so you can see the raw response before going live.
{"caller": "[tag:InboundNumber:Number]",
 "zip": "[user:zipcode|Gather:zipcode]",
 "ref_id": "[tag:Call:InboundCallId]"}
Step 3 — Map the request fields
The body above sends the three fields CallScaler reads. Pick the matching tokens from Ringba's tag menu if yours are named differently:
Pings without a caller or ZIP are rejected (missing_caller / missing_zip). If your Ringba account masks caller IDs on outbound pings, have your rep expose them for this target.
- •caller (required) — the inbound caller ID token. Ringba's
caller_idspelling works too. - •zip (required) — the caller's ZIP. If ZIP arrives from outside Ringba, create a URL Parameter (Integrations → URL Parameters) so a
[user:zipcode]token exists; if you collect it in-call, use your Gather token. The pipe syntax[user:zipcode|Gather:zipcode]sends whichever is available first.zipcodeworks as a field name too. - •ref_id (optional) — Ringba's inbound call ID, echoed back in the response and shown in both ping logs so you can reconcile call-by-call.
Step 4 — Parse the response
Still in Request Settings, map the parsing fields to CallScaler's reply:
- •Acceptance Parsing — property
acceptedEqualstrue. - •Dynamic Bid Parsing —
bid(dollars;bid_centsexists if you prefer integers). - •Dynamic Duration Parsing —
min_duration_seconds, the call length that call must reach to pay out. - •Dynamic number —
phone. Route the call there within 15 minutes (ttl_seconds); it's matched to your ping automatically and the caller skips the ZIP prompt.
{"accepted": true,
 "bid": 25.50,
 "phone": "+15125550123",
 "ttl_seconds": 900,
 "min_duration_seconds": 90,
 "duration_basis": "connected",
 "ref_id": "…",
 "ping_id": "…"}
Step 5 — Revenue settings
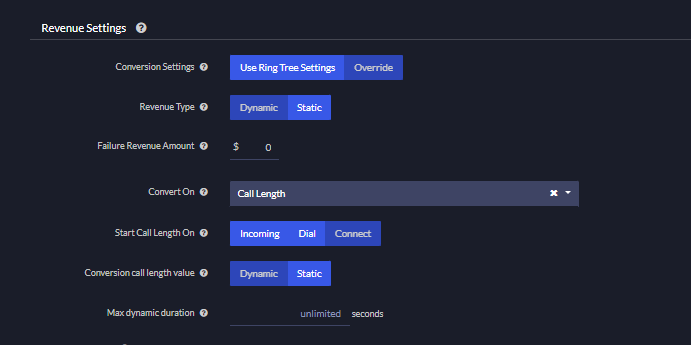
In the Revenue Settings section of the target, set Conversion Settings to Override and Revenue Type to Dynamic, so revenue records at the accepted bid.
Set Convert On to Call Length and use the campaign's minimum: the accepted ping's min_duration_seconds is the bar a call must clear to pay out. duration_basis tells you which clock it runs on — total matches Ringba's Incoming, connected matches Connect.
Step 6 — Create the Ring Tree
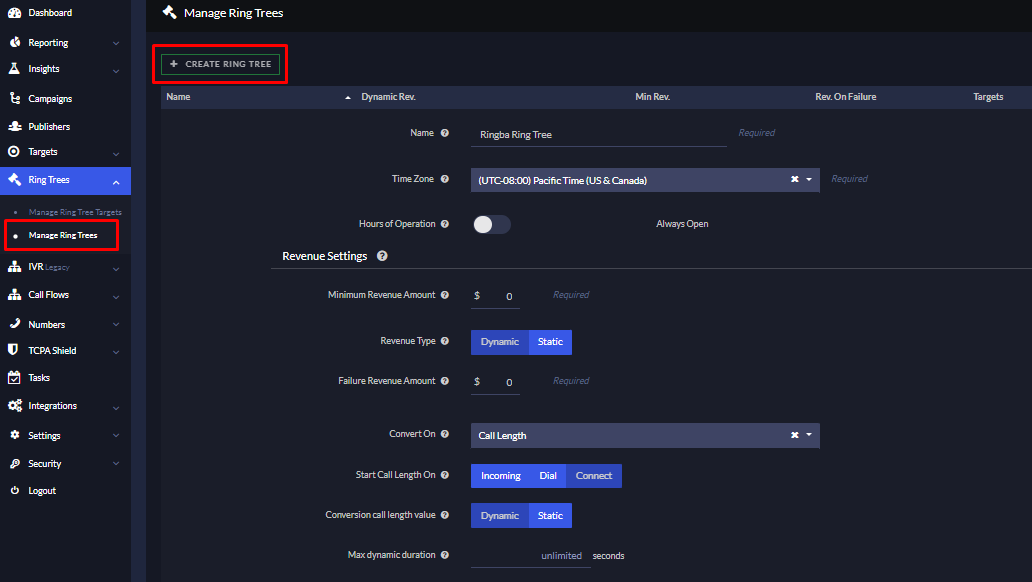
Go to Ring Trees → Manage Ring Trees, click Create Ring Tree, and fill in the name, time zone and hours. Repeat the same Revenue Settings as the target, and set your Minimum Revenue Amount — bids below it are ignored. In Add Ring Tree Targets at the bottom, search for the target you created, click Add, then Create Ring Tree.
Step 7 — Set the timeouts
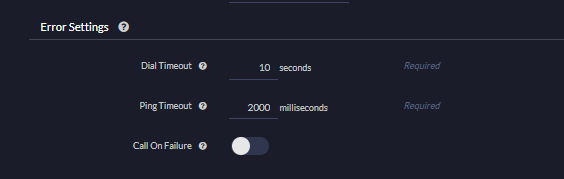
In the Ring Tree's Error Settings, set Dial Timeout to 10 seconds.
For the Ping Timeout, how fast CallScaler answers depends on the account you're pinging. If it routes only to direct buyers inside CallScaler, the ping comes back in milliseconds. But if that account is also pinging bidders outside CallScaler, the response waits on those external endpoints and can take a few seconds. Set the timeout to whatever you're comfortable with, but we recommend 4000–5000 ms — a too-short timeout reads a slow auction as a no-bid.
Step 8 — Add the tree to your routing plan
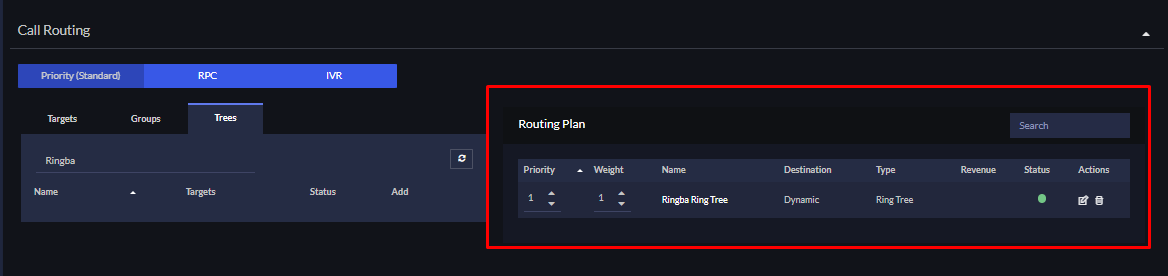
Open your Ringba campaign, go to Call Routing, switch to the Trees tab, search for the Ring Tree and add it with the arrow under the Add column. Set priority and weight like any other route.
Test and verify
Before going live:
- •Use Send a test ping on the campaign's API specs panel to confirm the endpoint answers before pointing Ringba at it. Pings are free — only routed, qualified calls move money.
- •Every Ringba ping appears in the campaign's ping log within seconds, including the reject reason:
bad_secret(header wrong or missing),missing_caller/missing_zip(field didn't arrive),no_winner(nothing bid on that caller/ZIP — not an error),campaign_inactive(ask your network contact). - •Before placing a real test call, register your phone as a test number in your publisher dashboard — calls from unregistered VoIP numbers are blocked as spam, and test-number calls connect without counting as a paid lead.
Related
On this page